Wednesday 7th October- Andy Farrington
We were all told to bring our cameras in for today's lesson as we were going to be learning about basic lighting setups. To see the effect of the different setups we would be taking photos of a model and observing what this did to the models face.
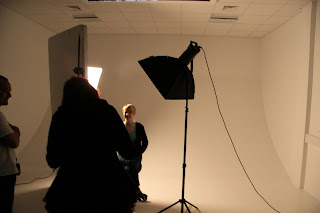
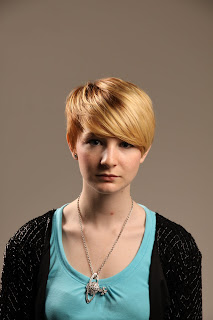
After taking all of the photos i compared them and noted the different effects from shot to shot i have recorded the various setups and shown examples of both the setup, and the photograph illustrating the effect.
All of the photos were taken with my Canon 50D with a 17-85mm lens, this is the camera that i will be using throughout my work, unless otherwise stated.
A light meter was used and read at 5.6 (f stop number for the aperture), we also set the ISO at 100 and the Shutter Speed to 125th of a second and the white balance was set to Flash- this is found in the camera's menu settings (on Canon 50D).
The sync lead was plugged into the back of the light and then the other end into my camera and i was ready to go.
Setup 1
In the curve studio Sam was sat down and to the right of her the single light with soft box, this was placed at a 45 degree angle and the light source was placed level with her eyes.
This is 45 degree lighting, and is often used for portraits.
F5.6, 1/125 Sec, ISO 100, handheld, un-edited.
As you can see from this image, there is a shadow to one side of Sam's face and the other is flooded with light and over-exposed and there is a loss of detail due to the over exposure. Overall this lighting creates a harsh and unkind effect on Sam's face and probably isn't the best lighting for beauty shots.
Setup 2
Lit from the side from above with the same soft box light, basically the same lighting as above but the light has been raised up.
The setup now encompasses two 45 degree angles making this 45/45 lighting.
F5.6, 1/125 Sec, ISO 100, handheld, un-edited.
Sam's face is still shadowed on one side and in contrast- brightly lit on the other side, the raised light has given a slightly more flattering and softer effect but there is still a lack of definition on the right side and too much shadow on the left.
Setup 3
Lit from above with the soft box on the right and a reflector to the left. This is also known as Rembrandt lighting as Rembrandt used this type of lighting effect in many of his paintings. It is often used in portrait photography and is known for its flattering effect.
F5.6, 1/125 Sec, ISO 100, handheld, un-edited.
The reflector has filled in the shadows and reflected the light back at Sam creating a more even and flattering look.
Setup 4
Lit with the same softbox from the left at 45 degrees.
Here you can see this has created shadows over most of Sam's face and therefore loss of detail.
Setup 5
Lit from the right and left both softbox lights at a 45 degree angle. The Aperture has been put down by half a stop to 6.3.
A much more flattering light, as her face is lit from both sides it is much more even.
Setup 6
Lit from above, the light was attached to a boom and the model was asked to look up toward the edge of the light.
This light has a really soft effect on Sam's face, her skin is almost glowing and there are no harsh shadows or lost detail.
Setup 7
Used the same lighting as above with the addition of a reflector on the model's knee.
This was a very similar set up to the previous one, the reflector just softens the shadows especially under the chin and reflects some light into the darker areas.
Setup 8
For the final setup a light was added on the floor behind Sam, this reflected off the back wall and also made Sam appear to stand out more and separated her from the background making her look more 3D.
The addition of the light at floor level behind Sam has created a brighter, whiter background and a very even light that appears to wash over Sam giving subtle and natural shadows yet maintaining the detail and highlights.
Main Learning Outcomes
- The use of basic lighting setups and a better understanding of the different effects created by them.
- A better working knowledge of my camera
- A basic understanding of using flash in the studio
Things to Improve/Learn
- Directional skills with the model- although i think this will improve when my knowledge of Photography and confidence increases.
- Spend more time framing a shot, when other people are around i have a tendency to rush the shot so think if i took my time this would improve the images.
- Camera settings- i need to read through the camera manual properly to fully understand the settings my camera has, how to change them and what they do.
Further Research
After our first studio session with Andy it gave me a much greater insight into some of the basic lighting setups, and also, if i am honest made me realise a bit more, how much there was to learn.
There were a few things that i struggled with and it became apparent they were important so i have since spent some time familiarising myself with the following:
- Changing the White Balance according the the various types of light.
(although, if shooting in RAW this can be edited in Photoshop)
- Using my camera in Manual- i have always used automatic shooting previous to this course and through lectures and studio sessions i have learn't the importance of shooting in manual and in RAW. I found it difficult at first when using Manual but after a few weeks i am now getting used to it.
Basic Lighting
I used Langford's Basic Photography to get a few of the facts on lighting.
The 6 characteristics of lighting are
-Quality
-Direction
-Contrast
-Unevenness
-Colour
-Intensity
Quality
This refers to the type of shadows cast by an object/person, they can be hard and harsh or soft and graduated and they depend on the light source being used.
Direct sunlight creates hard, clear cut shadows as can a small flash-gun, torch or spotlight.
Direction
The direction of the light affects where the shadows fall both on and around the subject.
Contrast
Contrast is the ratio between the brightest and most strongly lit parts of the subject and the darkest shadowed areas.
Digital and film cameras cannot accommodate as wide a range of brightness as the human eye, therefore if you have a very bright area next to a shadowed area the camera can only expose to suit one of them, see below example:
This photo was taken at sunset on my compact camera, although in actual fact it was a lot lighter than it appears, the camera has exposed for the very light sunset leaving the other area underexposed and dark, although in this particular image it works well as it creates a silhouette effect with the foreground and trees so your eye can concentrate on the sunset.
Contrast can be used to create texture, useful for example in some objects but maybe not so useful in a portrait as this would show any flaws in the skin.
Unevenness
Lighting unevenness can be a problem when you are using hard lighting from an un-diffused source, too close to the subject.
This is because the illumination on the subject drops to one quarter the brightness when you double the distance of what is almost a point source of light.
If you have a setup 1 meter wide then side light it from 1 meter away, the illumination across the subject will be four times (2 stops) brighter at one side than at the other.
To avoid such unevenness, pull the light source back farther, in a direct line from the set or alternatively diffuse the light, narrow the set or put the darkest, least reflective objects nearest to the light source.
Colour
Most light sources for Photography give off a 'white' light (a mixture of all colours).
Other light sources vary in colour such as street lights that give off an orange light.
Intensity
The intensity or brightness is different to contrast and unevenness, this is controlled by the aperture, shutter speed and also the ISO speed.
Link to Systems and Processes Brief
The lighting that we looked at in this studio session covered some of the points in my systems and processes brief, these are:
-45/45 degree
- High Key
- Low Key
- Back light
- Top Light
I have researched each one of these so that i fully understand them when doing the studio task with the pear but i will show this on a later post so that it closely links with the studio session.


0 comments:
Post a Comment