Showing posts with label Johns Lessons. Show all posts

Group Task- From Capture to Print

For the group task we were mixed with Group A, and all told to be on time at 10am as we would recieve a brief and have a set amount of time to produce a photograph in a group.

We recieved the brief and were given the following film titles to chose from:

  • Breakfast at Tiffany's
  • The Fountain
  • Into the Wild
  • Dead Man's Shoes
  • Dog Day Afternoon
  • Clockwork Orange
  • Sunset Boulevard
  • Three Colours Red
  • Stand By Me
  • The Thin Red Line
  • Rear Window
We were told to put ourselves in groups of no more than three and then produce a photograph influenced by one of the films.

I was in a group with Faye and Ryan, quite quickly we decided we wanted to do Clockwork Orange, i suggested we printed a photograph so that we could keep this in mind when looking for our costume and thinking about lighting.

We found these two images and decided to recreate something similar:


We went into town and bought a hat, a white shirt and some false eyelashes then rushed back to the studio to dress our model- Ryan.

We used a continuous fluorescent light in the studio as this created quite a cold feel which we wanted.

Here are some of the images i took on my camera followed by the final image that we submitted.


This is the final image that we produced. We tweaked a few things in Photoshop but didn't do too much editing as we had magaged to capture the essence of what we wanted already.

Lesson #3- Photoshop- A Basic Introduction

Wednesday 21st October- John Harrison


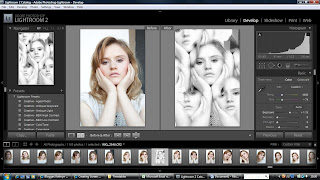
Last week we looked at Lightroom briefly on the projector screen, today we got the opportunity to log in to a mac computer and try to manipulate a photo ourselves.


We learn't some handy shortcuts for when using Lightroom, which should make things easier and quicker when processing a lot of images, the shortcuts are below:


- To hide the dock (on a Mac)- Press Alt, Command & D


- To put LR in full screen mode- Press F key. This is similar to the above on a PC.


- Turning off the side bars- Press the small arrow at the side of the screen, each one turns off the corresponding bar. The tab key turns all bars off at once, pressing it again makes them re-appear.


- To dim/ turn off the lights- Press the L key once to dim the background, then press again to black it out so all you see is the photo you are looking at, this makes it easier to look at an image.


Views


- Grid - Press G (multiple image view)


- Loupe - Press E (single image view)


- Compare - Press C (two images side by side)


- Survey - Press N (single image view- slightly different to Loupe)


- A useful tool is to select two images whilst pressing the shift key, then Press C to get Compare View and the two images will be displayed side by side- this is very handy when comparing two images that are slightly different.


- Zoom in/out- Press Z


- When in develop mode making adjustments to an image, press Y and LR will display the original image also, this way you can see clearly how the changes you have made have effected the image, and hopefully how much you have improved the image compared to the original.


Adjustments


- When using the adjustment brush- the brackets (the ones near the enter key on a laptop/pc) change the size of the brush


- To remove spots and make skin appear smoother, reducing the clarity when using the adjustment brush is a good way to do this.


Exporting Images


Exporting images is when you can re-size and covert the images amongst other things.


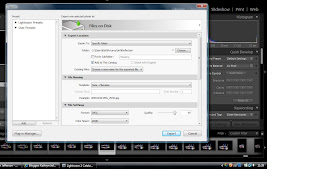
Press File then Export and it brings up this window:


-When clicking Files on Disk- the bar at the top of this window you can choose to save the exported images to either the hard drive or a CD or DVD. If choosing to save to the computer hard drive you can then choose where exactly to save it to and the name of the file.


-You can change the format of the images to one of the following compressed formats:


JPEG- this is known as 'lossy' compression as it crunches and compacts the data everytime you save which reduces the tonal range and definition.


TIFF & PSD- known as loss-less compression.


DNG- this is a RAW format.


- The quality bar ranging from 0 to 100 controls the amount of compression.


Re-Sizing Images


Click on the tick box saying resize to fit and then you can select how to size your images, a good way of doing it is by selecting Longest Edge which is as it sounds and sizes the images longest edge to the dimensions you set.


Useful dimensions for screen and print are:


Screen


Select Longest Edge- 900 Pixels- 72 PPI (Pixels per Inch)


This is a reasonable size for viewing images on the screen and they dont need to be bigger than this, the screen has a resolution of 72 PPI so it is pointless making the image any bigger than this.


Printing


Select Width and Height- 15 by 10 Inch- 300 PPI


The human eye cant really see much more than 240 PPI.


One of the options further down the screen is to minimize embedded Metadata, this is not wise as it forms part of the protection of the image as it holds the photgorapher's name etc.


After selecting the settings needed simply press Export.


We then opened up our image in Photoshop and John gave us a brief introduction.


Photoshop is a Destructive software if used incorrectly when an image is saved you cant go back. As opposed to Lightroom which is non- destructive software.


A few useful tools-


The hand tool is used for burning in and adding exposure.


The F key changes the background.


The most frequent tools we will use are found when you press Image then Adjustments.

Lesson #2- A Basic Introduction to Lightroom

Wednesday 14th October- John Harrison


Today we looked at Lightroom version 2 on the projector whilst John talked through some of its important and useful functions.


Lightroom is known as Digital Asset Management software, other examples of this would be Apple Mac's Aperture and Canon's DPP (Digital photo professional)- which i have tried out as i use canon, mainly i used this for the remote shooting funtion to practice setting my camera and get used to its funtions, i found this very helpful but didnt particularly like the rest of the software for ease of use.


Lightroom is used for Global Adjustments, it mostly edits the whole image.


Photoshop is used for Global and Local Adjustments.


There are 3 main overall functions in Lightroom:


Library used for organisation- (IN)
Develop used for manipulation- (MANIPULATE)
Slideshow,Print  and Web used for exporting- (OUT)


- It processes RAW files very fast


- Try to back up files at least once a month to prevent loss of work.


- When first using Lightroom go to Edit then Catalogue Settings and set the preview quality to High.


- When importing photos from Lightroom to help with organisation make a folder called Camera Originals and save all images here- this then saves a copy of the RAW images which acts as a backup to Lightroom.


Useful shortcut's


-Tab key- this minimises all of the function windows.
-Pressing L- dims the lights, press several times for a black screen around the image and again to return to the normal screen.
-Right click and image and go to Virtual Copy- this creates an exact copy.


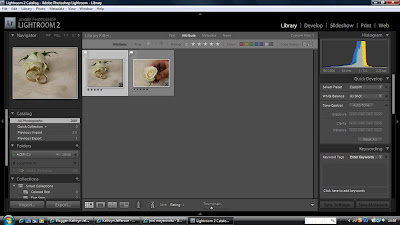
- selecting the star rating on an image can help seperate images into groups, for example if you select 5 stars on the rating on the image, then click on attribute and 5 stars and all of the images with a 5star rating will come up on the screen, see example below:


When in Library you can also flag and colour code images. Right click the flag on the image and select reject, this is useful when you have done a shoot and you are asked specifically not to use certain images- you can reject them using this function.


You can also quickly and easily rotate the images, this is much quicker than in most other software.


We looked at the Histogram, this is the desciption of the tonal range, from left to right it depicts the Shadows, Midtones and Highlights in the image, John advised we should "always shoot to the right", this means that we should be aiming to fill get more information on the right side of the histogram, usually students tend to have a lot of detail in the shadows and midtone section, he also suggested we start using the histogram on the image preview on our camera's LCD screen as this allows us to start learning more about what a properly exposed image is.


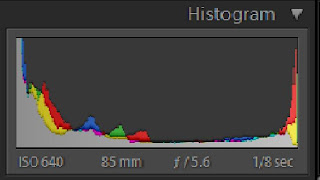
Clipping- is when the histogram appears to run off the edge- we should try to avoid this.


This is an example of a histogram showing clipping.


There are three parts in a histogram and the far right section takes 2 thirds of the camera's sensor and ability to record so to make use of this "shoot to the right".


Keywords- these are useful for corporate and editorial Photography.


Presets


Download new ones- type into google to download new presets and save into my copy of lightroom, such as- brighten eyes.


Clone Tool


This gets rid of unwanted things and can be used to 'airbrush' images and edit out spots and flaws in the skin. If you have a lot of very similar photos and want to edit the same thing out of all of them you can edit this then synchronise to apply to the other images.
To change the size of the brush use the brackets.
Another way to 'airbrush' is to use the orange in luminance to help reduce the appearance of spots and freckles.


Graduated Filter


The graduated filter is underneath the Histogram and can be used to create an area of graduation in an image this can be done by using a variety of functions including exposure which you select from the drop down box, when dragging the filter over the image press shift to keep the lines straight. Below is an example of an image that has had a graduated filter applied to it, and below that is the original image.


F16, 1/100 Sec, ISO 2400, handheld, edited in LR converting B&W and using a graduated filter.

F16, 1/100 Sec, ISO 2400, handheld, un-edited.

This tool is useful as it draws the eye into the image.

Lesson #1- Camera Set-up & Function


Wednesday 7th October- John Harrison

Today we looked first at different lens'

50Ml Lens

A 50ml lens is good for most purposes and John suggested over time this should be something we have in our kit, a fixed focal length lens teaches the photographer to use their legs to zoom in rather than moving the lens and becoming lazy.

A 50ml lens gives the same perspective as the human eye so is useful for portraits and most things.

Lens' on a FFDSLR (Full frame DSLR)

- A 28ml lens on a FFDSLR is classed as Wide
- A 50ml lens on a FFDSLR is classed as Standard
- A 85ml lens on a FFDSLR is classed as Telephoto

The Ratio from FFDSLR to DSLR is x 1.6